
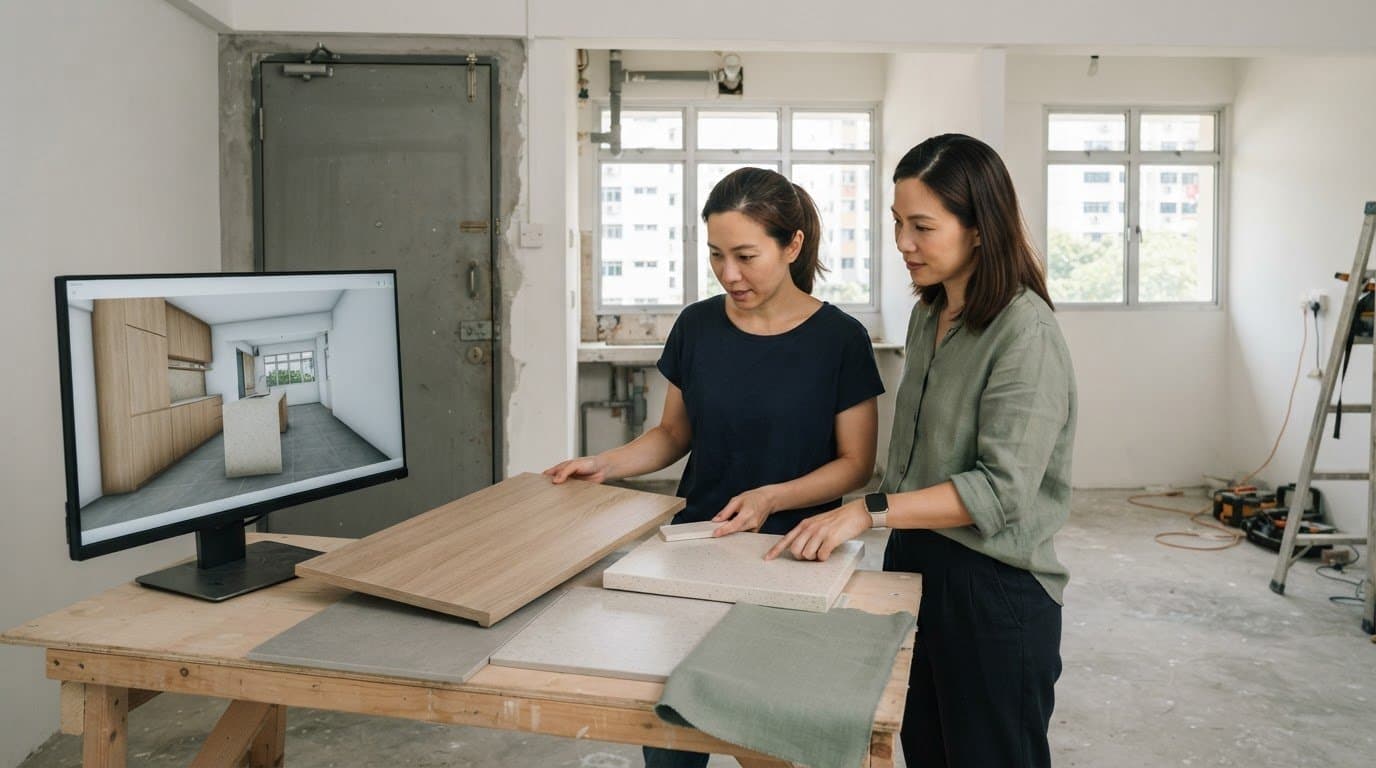
Benefits of 3D Visualization for Choosing Renovation Materials
Explore the benefits of 3D visualization for renovation: compare materials, colours, layouts and lighting before work begins, and plan with greater confidence.
What if you could see how your renovation materials, lighting and furniture work together before construction begins? 3D visualisation gives you a clearer view of the proposed space, so you can review choices in context rather than relying on floor plans or samples alone.
It’s understandable to want confidence before making design decisions. The benefits of 3D visualization for renovation include comparing finishes and colours, assessing room proportions and furniture placement, and spotting layout or lighting concerns while changes are still easier to plan. A visual model also gives you and your design team a shared reference for discussing the intended result.
In this article, you’ll learn what 3D visualisation can show, how it supports material selection, and where it can help you assess layouts, lighting and spatial proportions. You’ll also see what a visualisation can and cannot do, so you can use it as a practical planning tool alongside the details needed to carry out renovation work.
Key Takeaways
- Compare finishes in the context of the whole room to judge how materials and colours work together.
- Use an interactive model to examine how layout choices affect movement and the relationship between spaces.
- Review the proposed design before work begins to identify questions and discuss changes with your design team.
- Treat 3D visualisation as a planning aid, alongside the technical drawings needed to guide construction.
- For a renovation in Singapore, choose a visualisation service that fits your home type and project needs.
Table of Contents
- 1. How Does 3D Visualization Help With Material Selection?
- 2. What Are 3D Visualization Interior Services?
- 3. Is 3D Visualization Helpful For Renovation Projects?
- 4. Finding layout and lighting problems before construction
- 5. Planning furniture, room proportions, and spatial layout
- FT2 Interior Design
1. How Does 3D Visualization Help With Material Selection?
Choosing a tile, paint colour or cabinet finish from a sample alone can make it hard to picture the result across a whole room. A 3D rendering places those selections inside a proposed interior design, alongside the layout, lighting and furniture. One of the benefits of 3D visualization for renovation is seeing how finishes work together before you commit to a complete design direction.
For example, a design team can create two views of the same kitchen: one with light cabinetry and a contrasting backsplash, and another with darker cabinets and a quieter wall finish. Compare both with the flooring, work surfaces and lighting in the model. This makes it easier to explain which combination feels right and what you would adjust, such as the colour balance or the visual weight of a finish.
A structured review can reduce misunderstandings. First, the designer prepares a visual proposal based on the agreed layout and material choices. Then you review the room from useful viewpoints and raise specific questions: Does the backsplash compete with the cabinets? Does the flooring connect with the adjoining space? The designer can record your requested changes before the team proceeds with construction decisions.
This shared reference helps you, the interior designer and the project team communicate the design intent. A material name or written description can be interpreted in different ways; a realistic rendering shows how a finish is intended to look beside other elements. For example, you can view a bathroom tile with the vanity and wall finish, then discuss whether the combination matches the design direction.
3D visualisation also supports communication with contractors and other design professionals. When a rendering is paired with the relevant technical drawings, it can clarify the intended appearance and help the team identify design questions before work starts. It does not replace drawings that specify measurements and execution details. Instead, it gives the people involved a common visual reference for discussing finishes, furniture placement and changes.
The benefits of 3D visualization for renovation also include a clearer way to review decisions before construction. Use each review to resolve a defined choice rather than approve the image as a whole. Confirm the proposed materials, note any requested substitutions, and ask the designer to update the view where those changes affect the room. A rendering helps everyone discuss the same design, but it cannot show every physical quality of a material. Where texture or colour is important, compare the visual proposal with the actual sample before final selection.
2. What Are 3D Visualization Interior Services?
Interior visualisation turns a proposed design into a three-dimensional view of a space. A model can show how rooms connect, where openings are, and how furniture fits the layout. For example, you can assess whether a dining table feels too close to a kitchen island or whether there is a clear route between the entrance and living area. This gives you a visual basis for discussing spatial choices.
Interactive models let you explore those relationships from different viewpoints. A 360-degree panoramic view can help you look around a proposed room rather than rely on one fixed image. You can review how the living room relates to the dining area, then focus on details such as a doorway, storage wall or staircase. The benefits of 3d visualization for renovation include seeing how a layout works from more than one position.
Visualisation can cover more than interior rooms. Depending on the project, it may include exterior views and details such as windows, façade finishes or outdoor lighting. Inside, the model can bring together flooring, wall finishes, lamps and furniture. Seeing these elements in one view helps you understand how the overall design looks from a particular position, rather than interpreting separate plans and finish references.
Lighting is another detail to review. Ask the design team to show how planned lighting works with the room’s surfaces and layout. A living room with recessed lights, a pendant above the dining table and task lighting near a reading chair needs more than a fixture list; a model can show how the placements work together. Exterior views can also help you assess how planned lights relate to entrances or façade features.
FT2 Interior Design delivers its 3D design in 4 to 5 days from the first appointment. The visualisation can include details such as finishes, lighting and furniture, giving you specific elements to review as you discuss the design. The presentation’s level of detail shapes what you can assess in each view, from the overall arrangement to the look of individual surfaces.
Client engagement shapes the review process. First, the designer develops a model from the agreed project information. You then review the views, identify areas that need clarification, and share specific feedback. The benefits of 3d visualization for renovation also include giving you and the design team a shared way to assess layout choices and discuss revisions. The model supports that exchange, while technical drawings remain essential for construction details.
If you’re planning a home project, explore how professional 3D visualisation can help you assess its layout and details before work begins.
3. Is 3D Visualization Helpful For Renovation Projects?
Yes. For a renovation or retrofit, 3D models can represent how an existing home may look after changes to its layout, finishes and fittings. You can review the proposed result before physical work begins, then discuss design decisions with the people involved. This is useful when several rooms or connected spaces change together.
For Singapore HDB renovations, a 3D rendering is a design aid, not a permit or proof of approval. The project team must account for applicable HDB requirements and approvals separately, while technical drawings provide construction and execution details.
The main benefits are clearer design decisions, earlier identification of potential issues, and a shared view of the proposed result. For example, a retrofit that changes a doorway and nearby storage can be reviewed as part of the whole room, rather than as separate decisions. That gives project parties a specific design reference to discuss.
Use the model to bring the homeowner, interior designer and construction team together around the same design vision. The designer can present the proposed changes, while everyone identifies questions about how the new arrangement relates to the existing space. For a retrofit, this might mean reviewing a planned built-in beside an existing doorway before finalising the design.
Feedback is more useful when it refers to a visible detail. Instead of saying that a room feels wrong, point to the position of a partition or cabinet, or the connection between two spaces. The designer can record your comment, revise the relevant view and share the updated version with everyone involved.
3D visualisation also supports presentations beyond the design meeting. A homeowner can use a rendering to explain a proposed renovation to family members who share decisions about the space. Design teams can use visual views in project presentations or proposals, helping viewers understand the intended result without relying only on architectural terminology.
These views can give decision-making a clear sequence: review the proposal, identify an issue, discuss its effect and agree on a design change. For example, if a new partition makes an adjacent area feel enclosed, the team can assess an alternative before making construction decisions. This keeps the discussion focused on the design choice and its impact.
There are limits. A realistic virtual image cannot reveal every site condition or replace measurements, technical drawings and construction details. Finishes and lighting may also look different in the completed space. Treat the model as a visual planning reference, and base construction on the approved project information and appropriate technical documents.
4. Finding layout and lighting problems before construction
A 3D rendering can closely represent the planned design when its dimensions, finishes and lighting inputs match the project. It is a visual preview, not a guarantee of the exact finished appearance, because site conditions, material variation and installed lighting affect the result.
Review the model from the viewpoints you use every day. For example, check the route from an HDB flat’s entrance to its living area and see whether a proposed cabinet narrows the path. A perspective view can reveal how a partition affects the room’s openness, while a floor plan helps clarify its position and dimensions.
Review lighting separately. Ask the design team to show how planned fixtures illuminate key areas, such as a kitchen worktop, dining table or reading corner. Check for dark zones, glare on reflective surfaces and shadows cast by a pendant. A rendered view can help you discuss fixture placement before electrical work and ceiling details are finalised.
Textures and colours also affect how a room reads. A dark textured feature wall may appear more prominent beside pale flooring, while a glossy surface can reflect nearby lights. Compare these details in the same 3D rendering rather than treating each material as an isolated choice. Screen images help with visual comparison, but they cannot reproduce every physical surface exactly.
Reviewing the space in advance can make decisions more specific. Point to a doorway, ceiling edge or light position and explain what feels unsuitable. The designer can clarify the design intent and update the relevant view. This gives you and the project team a shared reference before construction decisions move forward.
Use a clear review sequence to reduce avoidable design changes during construction: compare the model with the intended layout, note each concern, agree on revisions, then align the updated visual with the technical drawings. For example, if a wardrobe door conflicts with a nearby light fitting in the proposed arrangement, the team can discuss the positions before installation. A 3D view can flag a design question; it does not replace site checks or construction documents.
Confidence comes from knowing what the rendering represents. Confirm which layout, finishes and fixtures appear in the current view, and distinguish approved choices from options still under discussion. If a wall, cabinet or lighting plan changes, review an updated model instead of relying on an older image. This keeps your feedback tied to the version the team intends to carry forward.
5. Planning furniture, room proportions, and spatial layout
A two-dimensional floor plan shows room boundaries, but offers limited perspective on how the interior feels. A 3D floor plan adds depth, helping you assess room proportions and possible layouts before renovation. For example, you can view how a sofa, coffee table and television relate within a living room, rather than judging each position from lines on paper.
Furniture placement affects circulation as well as appearance. An architectural visualisation can show whether a dining table interrupts the route between the kitchen and living area, or whether a bed leaves practical access around it. Use the model to discuss these relationships with the designer before settling the layout. It also makes the effect of moving an item easier to understand.
Review each room based on how you use it. In a study, consider the desk’s position relative to the window, storage and door. In a bedroom, look at the wardrobe’s position beside the bed and the available path to the entrance. These examples turn broad preferences into specific layout decisions the design team can address.
A 3D model also helps you judge proportions between built-in features and movable furniture. A tall storage unit can dominate a compact room, while a low console may leave more of the wall visible. Compare those options in the same view. The ability to see adjoining areas can also help you assess how a dining space connects with the living room.
Lighting and decor affect how the layout looks. Try a floor lamp beside a reading chair, or view a pendant above the dining table alongside nearby furniture. The model lets you consider these elements as part of the room arrangement. It can also help you discuss whether a feature draws attention away from a focal point, such as a window or artwork.
Make decisions in a clear order: assess the room’s main function, review key furniture positions, then consider circulation and supporting details. If a cabinet competes with a seating area, discuss another placement. If the dining area feels disconnected, review how its furniture relates to the kitchen and living spaces. Each adjustment should support how you plan to use the home.
3D visualisation supports planning, but the model should work alongside accurate measurements and construction drawings. Use it to compare spatial options and explain your priorities, then have the design team carry agreed decisions into project documents. To plan your home layout with professional support, request 3D visualisation services.
FT2 Interior Design
FT2 Interior Design can help you apply these visual planning ideas to a home renovation, from reviewing the proposed layout to clarifying design choices before work begins. Turn to the team when you’re planning an HDB BTO or resale flat, a condominium, or a landed property and want a clearer view of how the design may come together.
Use the design discussion to share how you want each space to function, which materials you’re considering, and what details need closer review. This gives the project team a focused basis for developing and discussing the renovation plan, while technical drawings guide construction. Contact FT2 Interior Design to discuss your renovation plans.
Make Your Design Decisions With Confidence
The benefits of 3D visualization for renovation are most useful when you turn the images into clear decisions for your home. Choose the questions that matter most to you, such as whether a material suits the room, how furniture fits, or where lighting should sit. Then use the design discussion to clarify priorities and agree on what should move into the project plan.
FT2 Interior Design supports homeowners planning HDB BTO Home Renovation, HDB Resale Home Renovation and Condominium Home Renovation. If you’re ready to discuss how visual planning could support your renovation, contact FT2 Interior Design. Bring your ideas and the decisions you want to work through. A clear starting point can help you shape a home that feels considered and practical for the way you live.
Frequently Asked Questions
Is 3D Visualization Helpful For Renovation Projects?
Yes, it helps you understand a proposed design before physical work starts. You can review design options with your household and design team using the same visual reference. For example, if family members have different preferences about an open-plan living area, a model can make each proposed arrangement easier to discuss. Use it to clarify design choices, while relying on project drawings and documents for construction details.
What Are 3D Visualization Interior Services?
They create visual representations of a proposed interior, with views that help you understand how rooms and design choices may come together. FT2 Interior Design offers free whole-house 3D design to homeowners who consult, including a 720° VR walkthrough. You keep the design even if you don’t proceed. A virtual walkthrough can help you discuss the overall feel of connected spaces, while still using technical drawings for construction information.
Can 3D Visualization Help Reduce Project Mistakes?
It can help surface design questions before construction, such as a proposed cabinet affecting access to a doorway. To make reviews useful, record the change being discussed and identify which model view it affects. After a revision, use the current version as the discussion reference. The 3D model supports design coordination, but it does not replace site checks, measurements or technical documents used to guide construction work.
Can I Change The Design After Seeing The 3D Render?
Yes. FT2 Interior Design allows revisions to its 3D design at no additional cost. Give clear feedback by naming the room and feature, such as the storage position in the bedroom or the finish on a kitchen cabinet. Once the updated design reflects your decisions, review it before moving to the itemised quotation stage. This keeps the discussion focused on changes you want incorporated.
How Does 3D Visualization Help With Material Selection?
It lets you see a proposed material alongside other finishes instead of judging it as a standalone sample. For example, view a cabinet finish with the selected flooring and nearby wall colour. Use the image to compare the design direction, then look at physical samples to assess the material’s actual texture and appearance. A screen rendering can guide the conversation, but it cannot reproduce every quality of a real surface.
What Can Be Shown In A 3D Visualization?
A renovation visualisation can show room layouts, furniture, finishes, lighting fixtures and design details in context. Depending on the presentation, you may review a room from several viewpoints or explore connected areas in a virtual walkthrough. For example, a view from the entrance can help you see how the living and dining areas relate. The project’s technical drawings are still needed for dimensions and construction instructions.
When Should 3D Visualization Be Done?
Use it after the main layout and design direction have been approved, but before final construction decisions and site work begin. At that stage, you can review how the selected design choices fit together and raise questions while changes can still be discussed in the planning process. FT2 Interior Design delivers its 3D design in 4 to 5 days from the first appointment.
How does 3D renovation visualization improve space planning and design decisions?
It helps you compare how proposed furniture and room arrangements affect the use of a space. For instance, view a study with a desk facing the window, then compare it with a desk along another wall. Consider the routes to doors and storage in both versions. This gives you a clearer basis for choosing a layout that supports your daily routines and priorities.
Related Articles

17
Nov
Open-Concept Office Acoustic Solutions for Quieter Workspaces
Explore open-concept office acoustic solutions, from panels to zoning, and learn...
16
Nov
Modern office reception area design for a welcoming first impression
Explore modern office reception area design ideas for a welcoming first impressi...
15
Nov
Post-Renovation Checklist Singapore: Before Moving In
Use this post renovation checklist Singapore homeowners can follow to remove fin...

14
Nov
Renovation Warranty Cover in Singapore: Defects and Claims
Searching "what does renovation warranty cover singapore"? Learn about workmansh...

13
Nov
Easy to Clean Kitchen Backsplash Ideas for Every Kitchen
Explore easy to clean kitchen backsplash ideas, from smooth glass and porcelain ...
12
Nov
Managing Renovation Noise Complaints: Hours, Limits and Next Steps
Managing renovation noise complaints in Singapore? Learn HDB work hours, restric...